Showing posts with label recipes. Show all posts

Thursday, March 21, 2013

Spicy Orange Stir-Fried Shrimp

Okay, I think THIS is my new favorite recipe.  I have been searching the ends of the internet for a spicy orange shrimp (or chicken) recipe that didn't pack a ton of calories and bad fats.  I HAVE FOUND IT, PEOPLE.

Feast, and enjoy.  I served with brown rice and roasted green beans.  The serving size (3/4 c.) of shrimp doesn't seem like much, but it is plenty!

Spicy Orange Stir-Fried Shrimp

(adapted from Cooking Light)

Ingredients
  • 1 1/2 pounds peeled and deveined large shrimp (this is 2 lbs before peeling)
  • 1 tablespoon cornstarch
  • 1/3 cup fresh orange juice plus zest of 1/2 the orange
  • 2 tablespoons low-sodium soy sauce
  • 1.5 - 2 tablespoons honey
  • 1 tablespoon rice wine vinegar
  • 1 tablespoon Sriracha
  • 2 tablespoons canola oil
  • 1 tablespoon minced peeled fresh ginger
  • 3 garlic cloves, minced
  • 1/3 cup chopped green onions

Preparation
  1. Place shrimp in a medium bowl. Sprinkle with cornstarch; toss well to coat. Set aside. 
  2. Combine juice, soy sauce, honey, vinegar, and chile paste, stirring with a whisk; set aside.
  3.  Heat canola oil in a large nonstick skillet over medium-high heat. Add minced ginger and garlic to pan; stir-fry for 15 seconds or until fragrant. Add shrimp mixture; stir-fry for 3 minutes. Add juice mixture and onions; cook 2 minutes or until sauce thickens and shrimp are done, stirring frequently. Serve immediately.

I didn't make a lot of changes to the original recipe, except to add orange zest and increase the amount of orange juice.  Honestly, I just used the juice of one orange and didn't measure it. 

Wednesday, March 20, 2013

Maple-Soy Glazed Chicken Thighs

Oh, how we LOVED this meal!  Maple-Soy Glazed Chicken Thighs with stir-fried asparagus.  A side of rice would have completely rounded out the plate, but since we're having rice later on in the week I left it off.  The thighs were a good size and I didn't leave the table feeling hungry, that's for sure.  The sauce is just TOO DIE FOR.  No, really.

I say that a lot, I think.  But it's always true.

So here's the recipe.  Pretty simple, nothing special at all... but the end product is just glorious.  This marinade would also be "especially delicious" (points if you get the reference!) over a white-fleshed fish fillet, shrimp, or any other cut of chicken.  Mmmm!!


Maple-Soy Glazed Chicken Thighs

 (slightly adapted from Cooking Light)
Approx. 301 cals for 5 oz cooked thigh


Ingredients
  • 1/2 cup maple syrup
  • 1/4 cup fresh orange juice (I would also add in some zest for an extra ZING!)
  • 2 tablespoons lower-sodium soy sauce
  • 1 tablespoon grated peeled fresh ginger
  • 1 teaspoon sesame oil
  • 1/2 teaspoon crushed red pepper
  • 2 garlic cloves, minced
  • 3.5 lbs boneless skinless chicken thighs
  • 1/2 teaspoon salt
  • 2 tablespoons sliced green onions

Directions

1. Combine first 7 ingredients in a small bowl, stirring with a whisk. Place maple mixture in a large zip-top plastic bag. Add chicken thighs to bag; seal. Marinate in refrigerator 1 hour.

2. Preheat oven to 375°.

3. Remove chicken from bag, reserving marinade. Place marinade in a small saucepan over medium-high heat; bring to a boil. Cook until marinade reduces to 1/4 cup (about 5-10 minutes).

4.  Arrange chicken in a single layer on a foil-lined baking sheet. Baste with 2 tablespoons maple mixture; sprinkle evenly with salt. Bake chicken at 375° for 20 minutes. Turn chicken over; baste with remaining 2 tablespoons maple mixture. Bake 15 minutes or until chicken is done; sprinkle with onions.

Thursday, August 23, 2012

Lightened Posole

I love posole.  Real posole.  It's a wonderfully light but flavorful Mexican soup that you can pile high with veggies...  or chips and cheese.  Or both.  Whatever you prefer.

You've never heard of posole?  I'm not surprised!  I hadn't either until my husband's mom made it a few years ago... and I've been hooked ever since.  HOOKED I TELL YOU.

If you've ever wondered why I married my husband, that was a big part. 

JUST KIDDING, HONEY.  :)

Anyway, posole is:  a traditional pre-Columbian soup or stew from Mexico, which once had ritual significance. Pozole was mentioned in Fray Bernardino de Sahagún's "General History of the Things of New Spain" circa 1500 CE. It is made from nixtamalized cacahuazintle corn (aka hominy), with meat, usually pork, chicken, turkey, pork rinds, chili peppers, and other seasonings and garnish.

Thank you, Wikipedia!  A real bowl of posole looks like this: 

link
I have this bag of posole ingredients that I bought at a craft fair...  last year.  It's still hanging out in the pantry.  I haven't made it yet because:
     a)  You have to soak the hominy 24 hours in advance
     b)  Um, preservatives, anyone?
     c)  It calls for salt lick. 

I have the salt lick in the freezer.  I need to make this posole.  It tasted really good at the craft fair, and surely it's still good.  The preservatives aren't going to KILL me...  But, for some reason, I haven't jumped the gun on it.  Maybe this fall, when it's cool.

But...  I found a recipe on Cooking Light for Mexican Hominy-Chicken Soup...  aka posole!  I decided to take the plunge and try it. 

Overall, it was a really good dish.  I did have to make some adjustments, but what's new?  Even Uz said it was really good, and ate it up.  That's a big deal, because my man obviously is used to real posole.  And at 235 cals for 1.5 cups of soup, I can't complain.

A few notes:  Next time, I think I may cook this using chicken on the bone.  For this recipe, I cooked a whole, 4-lb chicken in a crockpot.  I shredded the chicken and used 2 cups of that, as the recipe calls for.  However, I found it was missing some depth.  Most posole I've had used pork, so I might try a combination of pork and chicken next time.  Also, I think using homemade broth (cooked from chicken on the bone) would also give it more depth.  I've found that in soups, stews, or sauces, chicken on the bone really takes it to the next level.

Don't forget the toppings!  Traditional toppings for posole include:  thinly sliced/shredded green cabbage, thinly sliced or chopped radishes, diced onion, dried Mexican oregano, chips, sliced jalapenos, avocado, lime wedges, cilantro, cheese.  Also, we've usually had it with a VERY SUPER-HOT salsa made with dried chiles, garlic, and water.  That stuff is ATOMIC.  We just used Cholula this weekend, but the hot sauce it kind of a must, too.

The lime was really important:  for me, it took the soup from "good" to "oh yeah!".  So, be generous with the lime.

Enough chat.  On to the recipe already.

my bowl:  excuse the spoon!  I was ready to dig in.

Lighter Posole

Adapted from Cooking Light

Stats:  235 per bowl, not counting toppings
Serves:  4 (~1.5 c)

1 tablespoon olive oil 
1 3/4 cups chopped onion  
3 garlic cloves, minced
 1 jalapeño pepper, seeded and minced
2 cups shredded skinless, boneless rotisserie chicken breast 
1/4 teaspoon freshly ground black pepper 
dried oregano, to taste
2 (14-ounce) cans fat-free, lower-sodium chicken broth 
1 (15.5-ounce) can hominy, rinsed and drained 


Heat olive oil in a large saucepan over medium-high heat. Add onion to pan; sauté 2 minutes.

Stir in garlic and jalapeño; sauté 1 minute.

Add chicken, black pepper, oregano, and broth; bring to a boil. Reduce heat, and simmer 5 minutes.

Stir in hominy; bring to a boil. Cook 5 minutes.

Ladle about 1 1/2 cups soup into each of 4 bowls; top each serving with your choice of toppings.  Suggested toppings:  cilantro, shredded cabbage, lime, sliced radishes, hot sauce, chips.


Wednesday, August 22, 2012

Hot Artichoke Dip

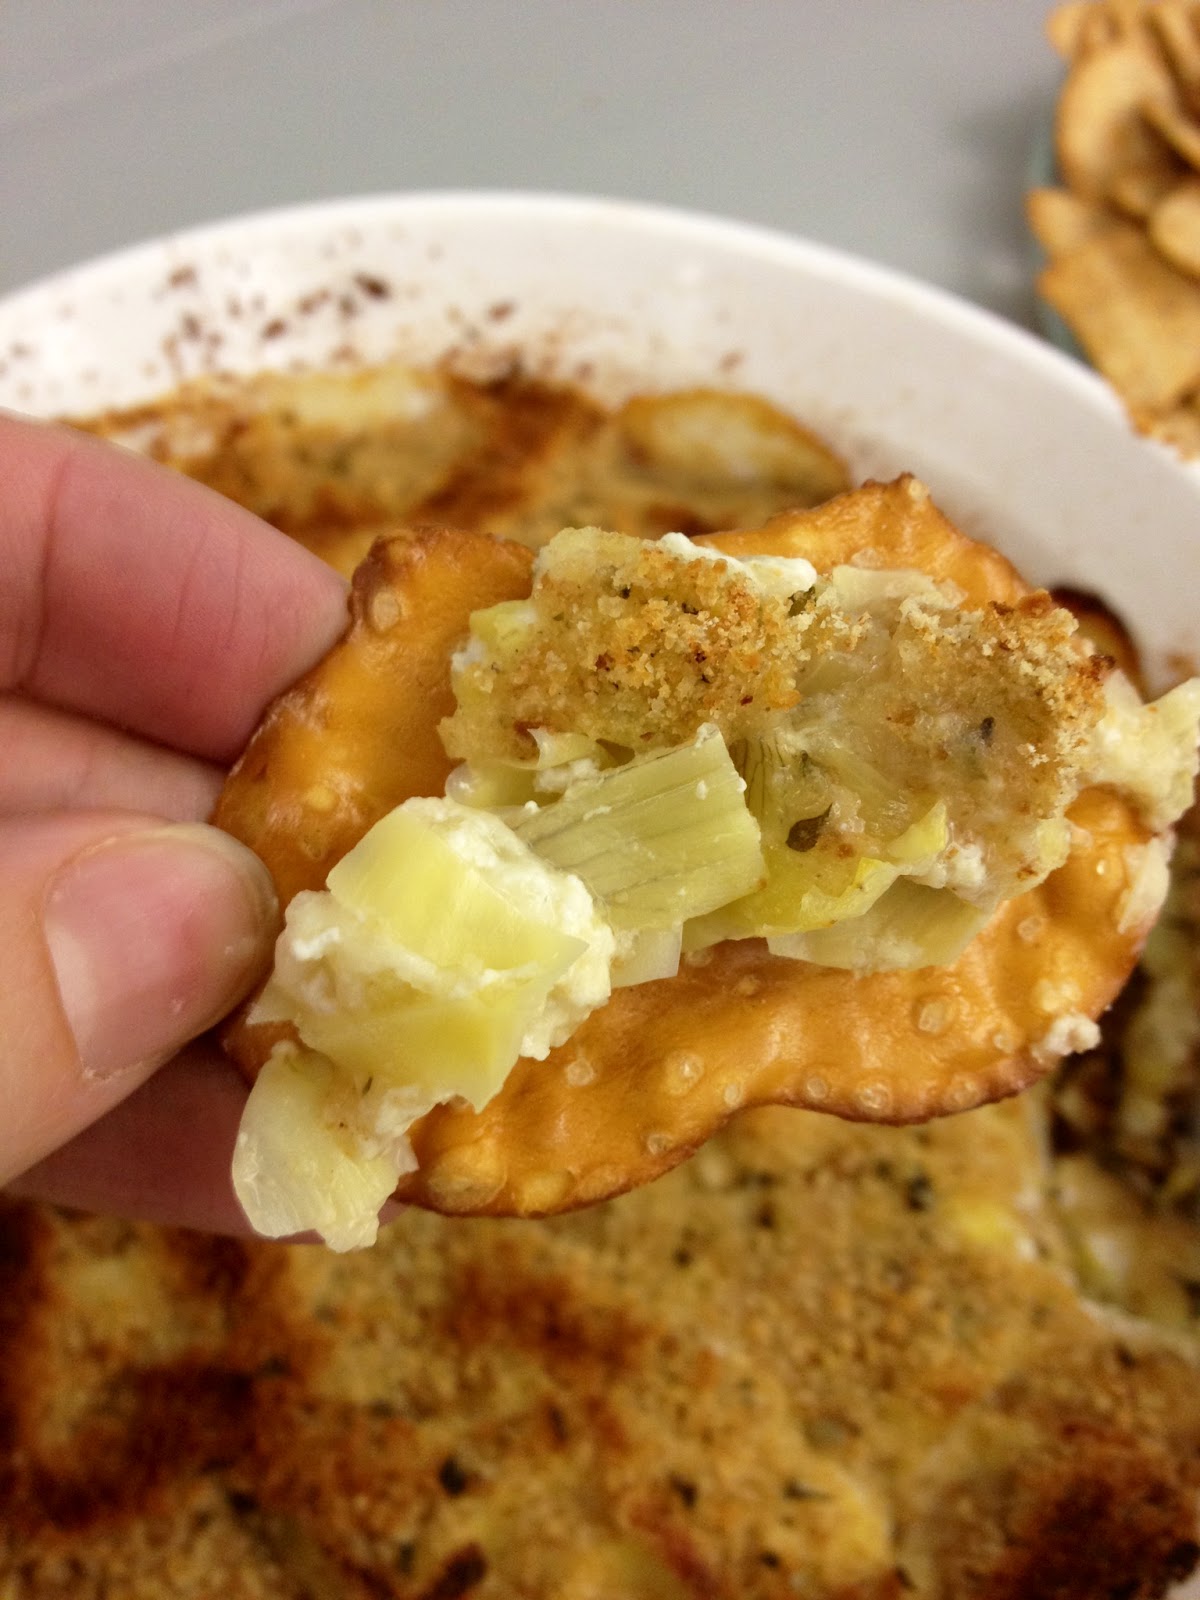
I made this hot artichoke dip for a family and friends get-together over the weekend.  It was pretty popular, but I think next time I would definitely chop most of the artichokes up quite small, and only leave a few chunkier ones.  I would also double the creamy filling; it seemed that the ratio of artichokes to filling was a little off.

This is really weird.  I am totally analyzing the ratio of artichokes to filling.  Okay, it was just a little bit too "artichoke-y" for me.  It was eaten and people went back for seconds (and thirds!), but it's really rare that I think a recipe can't be improved.  It drives Uz nuts, but, whatever.  He can get over it...  it just means he has to taste-test my experiments more often, and what guy can really complain about that??

SkinnyTaste calls for light mayo, but I hate mayo of any kind, so I just doubled the amount of Greek yogurt.  That also lowered the stats for this recipe, so I can't complain.  If you want to use light mayo, go ahead... just don't tell me.  I might gag.  It's a reflex.

So, make this dip.  Double it (I did!).  And, either reduce the amount of artichokes or double the amount of filling.  Trust me on this.  Or, if you're a really artichoke-y kind of person, then don't.

Oh!  And you want a really crispy top?  At the end of baking, set it underneath the broiler for a couple minutes.  YUM.

Is it strange that I'm trying to figure out a way to make this a main dish?  I just LOVE hot, cheesy dips.  Mmmmm...

please don't mind my gigantic, unmanicured fingers...  you caught me red-handed in the dip!

Skinny Hot Artichoke Dip

Adapted from SkinnyTaste

Stats: 74 cals (if you use 1/4 c. light mayo); 55 cals (if you use all Greek yogurt)
Serves: 10 (about 1/4 c.)

13.75 oz artichoke hearts packed in water, drained
2 tbsp chopped shallots
1/4 cup fat free Greek yogurt
1/4 cup light mayonnaise (or 1/4 c. Greek yogurt)
1/3 cup grated parmesan or similar cheese
1/2 cup (2 oz) shredded part skim mozzarella cheese
salt and fresh pepper to taste
2 tbsp whole wheat bread crumbs
olive oil spray


Preheat oven to 400°.

In a small food processor, coarsely chop the artichoke hearts with the shallots.

Combine artichokes, yogurt, mayonnaise (if using), parmesan cheese, mozzarella, salt and pepper in a medium bowl. Place in an oven-proof dish and top with breadcrumbs. Lightly spray the crumbs with olive oil then bake at 400° for 20-25 minutes, until hot and cheese is melted. For a melty-crispy top, stick under the broiler for a couple minutes until golden brown. Serve right away.

Can be made one day in advance without the breadcrumbs and stored in the refrigerator before baking. Add breadcrumbs before baking. Makes about 2 1/2 cups. 


Tuesday, August 21, 2012

Skinny Carrot Cake

A very tasty carrot cake recipe...  just make sure to bake it long enough, so the middle isn't too "wet".  Whoops!


Skinny Carrot Cake with Cream Cheese Frosting

from SkinnyTaste

Stats:  301 cals
Serves: 16 (1 slice)

3/4 cup all-purpose flour 
3/4 cup whole wheat flour 
1 cup granulated sugar 
1/4 cup flaked sweetened coconut (although I used unsweetened, and it was fine)
2 tsp baking soda 
1 tsp salt 
2 tsp ground cinnamon 
2 tbsp canola oil 
2 large eggs 
1 1/2 tsp vanilla 
2 cups grated carrots, peeled 
20 oz. can crushed pineapple in juice, drained  
 1/4 cup chopped pecans plus 1/4 cup for topping

For the Cream Cheese Frosting:
 8 oz 1/3 fat Philadelphia Cream Cheese
 1 cup powdered sugar
 1 tsp vanilla extract

Optional add-ins:  raisins, dried cranberries, etc.

Note:  I might run the pineapple through the food processor next time; some places it was too chunky.

IMPORTANT:  Make sure to drain the pineapple WELL, or it will be too wet and won't cook properly.


Preheat oven to 350°. In a large bowl, combine flour, sugar, coconut, baking soda, salt, and spices; stir well with a whisk.

In a medium bowl, combine oil, eggs, and vanilla; stir well. Add grated carrots and pineapple; mix well. Fold wet ingredients with the dry ingredients, batter will be stiff and dry but keep folding it and it will all come together. Fold in 1/4 cup chopped nuts.

Spoon batter into an 8" or 9" cake pan coated with cooking spray. For me, it was big enough; however, there were some comments that they had to make 4-6 muffins for the batter to fit. 


Bake at 350° for about 40-50 minutes, depending on pan size or until a wooden toothpick inserted in the center comes out clean and cake is pulling away from sides of pan. Cool cake completely on a wire rack.

To prepare frosting,
beat together cream cheese, powdered sugar and vanilla until smooth. Spread frosting over top of cake. Garnish with remaining chopped pecans.


Friday, August 17, 2012

Pork, Apricot, Onion Kabobs

I was a little worried about this, seeing that pork is pretty easy to mess up if you haven't worked with it a lot.  And, uh, I haven't.  Not like this, I mean.  It can be pretty hit and miss...  so I was really excited that these weren't dry at all!  Just make sure that you do not overcook the pork.  It'll continue to cook a little bit even after you take them off, so when there's just a tiny bit of pink left, take them off the grill and let them sit a few minutes.  They should finish cooking and be perfect!

The grilled apricots were sweet and tart at the same time!  I love grilled fruit, and I think I might have to start adding apricots to my kabobs more often.

One note...  This did not fit on four skewers.  There was still apricots and some meat leftover, so we stuffed the meat on the skewers and ended up grilling the remaining apricots in the grill pan with some broccoli.  It turned out fine, but you might want to keep that in mind if you have a limited number of skewers, like me.


Pork, Apricot, Onion Kabobs

adapted from Martha Stewart
Serves:  4
Stats: ~253 cals per kabob

1-lb pork tenderloin, cut into 12 or 16 chunks
~1 lb apricots, pitted and halved (or quartered)
1 small onion
1/4 c. apricot jam or preserves

Thread the meat, apricots, and onion on kabob skewers.  Light the grill to medium, lightly oil grates with canola or vegetable oil so the kabobs won't stick.

Martha's recipe for the basting sauce is as follows:  In a small saucepan, heat jam, cayenne, and 1 tablespoon water over medium-low until jam is liquefied; season with salt and pepper.  We were low on time, so we just brushed the preserves on the kabobs directly.

Grill kebabs, turning occasionally and brushing with basting sauce, until pork is cooked through and apricots begin to char, 12 to 14 minutes.


I served ours with baked rice and peas (scroll down), and grilled broccoli.  I look forward to eating it for lunch as leftovers!  NOM.


Wednesday, August 15, 2012

Sausage Stuffed Zucchini Boats

Oh, wow!  That's all I can say.  I loved this meal.  I didn't serve any sides with it, but next time I probably would.  I did serve it with extra marinara, so Uz got to smother his meal in marinara to his little heart's delight.  What can I say, I do what I can to make my man happy. 

I imagine that you could sprinkle whole wheat seasoned breadcrumbs on top, and at the end stick it under the broiler to get a crispy topping if you'd like.  I might try it next time!

Anyway...  feast yourselves! 


Sausage Stuffed Zucchini Boats

from SkinnyTaste
Serves:  8
Stats:  153 cals per boat (half a zucchini)

 1 1/4 cups quick marinara sauce
4 (31 oz total) medium zucchini
1 tsp oil
1/2 small onion, finely diced
3 cloves garlic, crushed
1/2 cup diced red bell pepper
14 oz lean Italian chicken sausage, removed from casing (Al Fresco)
1/2 cup part skim shredded mozzarella (Polly-O)
8 tsp grated Parmesan cheese

Bring a large pot of water to boil.

Preheat oven to 400°. Cut zucchini in half lengthwise and using a spoon or melon baller, scoop out flesh, leaving 1/4" thick. Chop the scooped out flesh of the zucchini in small pieces and set aside.

Drop zucchini halves in boiling water and cook 1 minute. Remove from water.

Place 1/4 cup of sauce in the bottom of a 9 x 12" baking dish, and place zucchini halves cut side up.

In a large saute pan, brown sausage, breaking up as it cooks into smaller pieces until browned; set aside. Heat oil and add onion, garlic and bell pepper. Cook on a medium-low heat for about 2-3 minutes, until onions are translucent. Add chopped zucchini, season with salt and pepper and cook about 2-3 minutes. Combine with sausage and cook a few more minutes.

Using a spoon, fill each hollowed zucchini with 1/3 cup cooked sausage, pressing firmly. Top each with 2 tablespoons each of sauce, 1 tablespoon each of shredded mozzarella cheese and 1 teaspoon each of parmesan cheese. Cover with foil and bake 35 minutes until cheese is melted and zucchini is cooked through. 


Monday, August 13, 2012

Light Chicken Divan

The first time I tried this Chicken Divan recipe, I did not like it.  However, after a friend of mine tried it recently and really enjoyed it, I gave it another chance.  Just one more, to really prove itself.

And I'm glad I did!  This time, I made a couple small changes:  I used white cooking wine instead of cooking sherry, and that made a HUGE difference in the flavor.  I also tasted the sauce before spreading it over the casserole, and was able to season it a little more to my liking.  Lastly, and maybe most importantly, That said, we both really liked this recipe and plan to have it again soon.


Light Chicken Divan

from SkinnyTaste
Serves: 8
Stats:  304 cals per serving

1-1/2 lbs broccoli (3 large heads) chopped
24 oz boneless skinless chicken breasts (or 18 oz cooked)
salt and fresh ground pepper
1 tbsp butter
2 tsp extra virgin olive oil
2 cloves garlic, crushed
2 tbsp shallots, minced (onions would work too)
4 tbsp flour
1 cup fat free chicken broth
1 cup 2% milk
2 oz white cooking wine
6 oz shredded (reduced-fat) swiss
1/4 cup grated parmesan cheese
1/4 cup seasoned whole wheat breadcrumbs
cooking spray

Bring a large pot of water to a boil. If you are going to poach the chicken, do so now.  Remove the chicken and let cool.  When cooled, slice chicken into bite sized pieces.  Add the broccoli and blanch 3 minutes. Rinse with cold water to stop the cooking. Drain well and set aside.  NOTE:  Drain well.  It's important, unless you want a really watery casserole.  I made that mistake the first time.

Preheat oven to 350°. Grease a 9 x 13 inch baking dish with cooking spray.

If you are not going to poach the chicken:  Season the chicken with salt and pepper. Using a grill pan or Forman grill, saute chicken on medium-low heat on both sides until browned, and just about cooked through, about 5 minutes on each side. Remove from heat and transfer chicken to a cutting board. When cooled, slice chicken into bite sized pieces.

Heat a medium skillet on medium heat. Add the butter and oil until melted and then add garlic and shallots. Sprinkle the flour and whisk until smooth. Stir in broth, milk and sherry and bring to a boil. Remove from heat and stir in half of the swiss cheese. Season to taste with salt and pepper.

Arrange the broccoli in a casserole dish and pour half of the sauce over the broccoli. Arrange the chicken on top and cover with remaining sauce. Sprinkle the remaining swiss cheese, grated parmesan and top with breadcrumbs. Spray a little oil on top.

Bake 30 minutes, serve hot.

If you want a crispy top, like shown in the picture, when done baking turn on the broil and let sit under it for a few minutes, until crispy.  Do not let it burn.


Monday, August 6, 2012

Skinny Lo Mein

Mmmmm!  This dish is wonderfully delicious and FAST.  If you have your veggies cut up, you can be in and out of the kitchen in 30 minutes.  No, really...  I'm telling the truth.  This recipe makes 4 good-sized bowls.  The sauce is perfectly savory without being overly salty.  The vegetables are perfect...  don't worry about what the recipe calls for, just use whatever you've got in the fridge!  It's a great way to get rid of stuff before it gets too old...  take it from me, that's exactly what I did!  I wanted to include broccoli, like the original recipe, but I didn't have any quickly available...  so I just used what I had in the kitchen and it was fantastic.

Another thing that I really love about this meal is that it is totally budget friendly.  Uz and I are trying really hard to stop some unnecessary spending in our lives...  with my surgery, birthdays, and the holidays coming up, we'd like to be able to put back some money for those events and still pay down a good amount on our student loans.  This recipe just needs some chicken and whatever vegetables you want to get rid of, and the sauce is really cheap to make as well.  Add that to the fact that it's super-fast, and I have a feeling that we'll have some sort of spin off of this meal quite often in the next few months.

So do yourself a favor and whip this up...  impress someone with your culinary skill and present them with Skinny Lo Mein!


Skinny Lo Mein

Adapted from Iowa Girl Eats

8 oz dry spaghetti (I like Smart Taste Ronzoni)
2 TBS oyster sauce
4 TBS reduced sodium soy sauce
1/2 cup chicken broth
1 tsp minced garlic
~ 1 TBS Sriracha sauce, if you like it hot
3 tsp canola oil
16 oz boneless skinless chicken breast
salt & pepper
1.5 c sliced carrots
2 large celery stalks, thinly sliced
8 oz mushrooms, sliced
4 green onions, chopped
1 red bell pepper, sliced

Cook spaghetti in a large pot of salted boiling water until al dente. Drain then set aside. Combine oyster sauce, soy sauce, chicken broth, garlic, and Sriracha in a small bowl then set aside. Season chicken strips with salt & pepper then set aside.

Heat an electric wok to 375 degrees, or a very large skillet over high heat. Add 1 teaspoon oil then add chicken and cook until no longer pink in the center. Remove to a plate and set aside. Heat another teaspoon of oil in the wok then add carrots and celery. Cook until slightly tender. Add remaining teaspoon of oil then add mushrooms, bell pepper, and green onion. Cook until vegetables are tender, about 3 minutes.

Add cooked chicken and noodles back into the wok. Pour in sauce, then mix together well, and serve.

Friday, August 3, 2012

Summer Veggie Skillet with Potatoes and Chicken Sausage

You know what I loved about this meal?  Besides the fact that the potatoes were out of this world...  and besides the fact that the vegetables were perfect and the chicken sausage was divine.  It's a one pot meal.  I only had one dish to wash, besides a couple bowls to hold the meat and potatoes in.  It was heavenly!

Uz and I both voted this meal a 10 out of 10!  I'm sure we'll have it again soon... and I can't wait to remake it with fall veggies when it's that time of year.

This is also dairy-free, gluten-free, and egg-free for those of you who look for that.

Enjoy!


Summer Veggie Skillet with Potatoes and Chicken Sausage

From SkinnyTaste
Serves: 4 (about 1.75 c.)
Stats: 326 cals

1 lb baby red potatoes, cut in half or quartered
2 tsp oil
1/2 tsp garlic powder
1 tsp kosher salt
fresh cracked pepper
14 oz Italian chicken sausage, sliced 1-inch thick
1 large onion, chopped
4-5 cloves garlic, smashed with the side of the knife (do not use jarred minced garlic, you need the real thing!)
1/2 orange bell pepper, diced 1-inch squares
1/2 yellow bell pepper, diced 1-inch squares
1 red bell pepper, diced 1-inch squares
2 tbsp fresh rosemary (or other fresh herb such as thyme)
2 cups zucchini, 1/2 inch thick and quartered

Place oil and potatoes in a large, deep non-stick skillet with a tight fitting lid on high heat; season with garlic powder, salt and pepper. When the skillet gets hot and starts to sizzle, reduce heat to low and cook with a tight lid on for about 20-25 minutes, shaking the pan occasionally to prevent the potatoes from burning. Remove from heat and let them sit 5 minutes without removing the lid.  Set potatoes aside on a dish.

Add the sausage to the skillet and saute on medium-low and cook, stirring occasionally until browned but not quite cooked through, about 10 minutes. Season chopped vegetables with salt and pepper. Add onions, peppers, garlic and rosemary to the skillet and mix. Continue cooking stirring occasionally until onions and peppers become slightly browned. Add zucchini and cook an additional 5 minutes, mixing as it cooks until cooked through.

Return the potatoes back to the skillet and mix well. Adjust salt and pepper as needed; cover and cook 5 more minutes.

Makes about 7 1/2 cups. 


Wednesday, August 1, 2012

Lightened Arroz con Pollo

Arroz con pollo is a simple dinner of chicken and rice.  I especially love this meal because it's a one-pot dish.  At the end of dinner, I don't have a sinkful of dishes to deal with...  and that's just what the doctor ordered on a hot, 112 degree summer day. 

Funny story...  like I said, it's been hot.  Not just hot, but HOT.  As in highs ranging from 108-115 degrees F.  And last night, for a minute, we lost power.  No big deal because it came back on... but now our A/C is acting funky.  I guess this is a not-so-funny story.  We turned the thermostat up to 75 or 76 and ran fans all night as high as we could to keep cool and give the A/C a break.  We hope that it's just extremely hot and the A/C is trying to keep up... not that it's broken or is going to break at any minute.  We're brand-new home owners, so we're learning as we go.  If it keeps making noises tonight, I'm calling the air-guy!

Anyway, I turned the thermostat up to 78 when I left for work today, and shut all the blinds and curtains as tight as I could.  The fans are running and I hope that the A/C is in a better mood when I come home tonight.

So, arroz con pollo.  I've made it with chicken thighs, chicken legs, and skin-on, bone-in chicken breasts.  I love this meal!  It is one of my favorite "comfort food" dishes!

I got these chicken legs for about $3.50 when Sunflower was having markdowns.  There were 7 in the package; I froze the extra to eat with another meal later.  Arroz con pollo is definitely budget-friendly, so keep that in mind if money is tight but you want something hot and filling.


Lightened Arroz con Pollo

from Skinnytaste
Serves:  6-8
Stats:  214 cals for 1 cup rice (makes about 8 cups total)
     94 cals for large skinless drumstick
     145 cals for large skinless chicken thigh


8 medium or 6 large bone-in, skinless chicken thighs OR 8 medium or 6 large bone-in skinless chicken drumsticks
1 tbsp white vinegar
2 tsp sazon (or make your own with a recipe at the bottom of the page)
about 1/2 tsp adobo powder
about 1/2 garlic powder
3 tsp olive oil
1/2 yellow onion
1/4 cup cilantro
3 cloves garlic
5 scallions
2 tbsp bell pepper
1 jalapeno pepper (leave out if you don't like spicy)
1 medium-large tomato, diced
2 1/2 cups enriched long grain white rice
4 cups water
1 chicken bouillon cube
salt to taste (about 2 tsp)

Season chicken with vinegar, 1/2 tsp sazon, adobo and garlic powder and let it sit 10 minutes. Heat a large deep heavy skillet on medium, add 2 tsp oil when hot. Add chicken and brown ~5 minutes on each side. Remove and set aside.

Place onion, cilantro, garlic, scallions and peppers in mini food processor. Pulse to roughly chop, but not so much that it's a paste. Add remaining teaspoon of olive oil to the skillet and sauté onion mixture on medium-low until soft, about 3 minutes. Add tomato, cook another minute.

Add rice, mix well and cook another minute. Add water, bouillon (be sure it dissolves well) and remaining sazon, scraping up any browned bits from the bottom of the pot. Taste for salt, should taste salty enough to suit your taste, add more as needed.

Add chicken and nestle into rice, bring to a boil. Simmer on medium-low until most of the water evaporates and you see the liquid bubbling at the top of the rice line, then reduce heat to low heat and cover. Make sure the lid has a good seal, no steam should escape (You could place a piece of tin foil or paper towel in between the lid and the pot if steam escapes).

Cook 20 minutes without opening the lid. Shut heat off and let it sit with the lid on an additional 10 minutes (don't peek!!!) Fluff with a fork and eat! 


Homemade sazon: 

1 packet is 1 1/2 tsp

1 tbsp ground coriander
1 tbsp ground cumin
1 tbsp ground annatto (achiote) seeds
1 tbsp garlic powder
1 tbsp onion powder
1 tbsp salt

If you can't find annatto you could use paprika instead.


For dinner, I had a medium-large leg and 3/4 c. rice.  I picked the skin off the drumstick before I ate it.  The rice was just so good, I had to go back for another 1/4 c. or so!  The only thing I would change if I could, would be to fit in 8 drumsticks.  However, my very large skillet won't fit 8 large drumsticks.  Possibly, 7?  I'll try it next time. 


We hardly ever finish all the rice, so I stick it in a freezer-safe bag and freeze it to have with a meal later on.  It keeps really well if you package it correctly, and I enjoy having a fast and easy side dish on hand.

Light and Lemony Blueberry Buttermilk Cake

When we have a birthday at work, I try to bring some sort of "treat" to celebrate.  I saw this recipe on Skinnytaste a while ago, but I didn't have much of an excuse to whip it up until recently.  I mean, I could have just baked it "just because", but I'm trying to limit my sweets... so it never really happened.

I am so glad I tried this.  I have made it three times in the past two weeks...  I made a full cake for a birthday celebration at work, a half batch for me and Uz to chow down on, and then another full batch this past weekend to eat at our Spanish service on Saturday evening.  I just love it!

The blueberries do tend to sink to the bottom.  If that bothers you, instead of mixing all the blueberries with the batter, I would only mix half and sprinkle the remaining half on top of the cake once you've poured it into the dish.  Perhaps all the berries wouldn't sink to the bottom that way.  I haven't tried it, so I can't say for sure if it will work!

I've served it plain, topped with powdered sugar, and with Cool Whip.  So get creative!  I'm toying with using other summer berries (such as chopped strawberries, blackberries, raspberries)...  doesn't that sound wonderful?

It's moist and and just plain delicious without being overly sweet.  One word of warning...  this dessert goes best with coffee! 


Light and Lemony Blueberry Buttermilk Cake

From Skinnytaste.com
Serves: 18
Stats: ~168 cals per serving

2 3/4 cups cake flour
1 1/2 tsp baking soda
1/2 tsp salt
1 1/4 cups sugar
4 tbsp softened unsalted butter
3/4 cups unsweetened applesauce
3/4 cups low fat buttermilk
zest of one lemon
2 cups blueberries
1 large egg, beaten
2 large egg whites
2 tsp vanilla
baking spray

Preheat oven to 325°.  Grease a 13 x 9 inch baking pan with baking spray.

In a large bowl combine flour, baking soda, and salt in a large bowl. Mix well.

Using a hand mixer or stand mixer, in a medium bowl, beat sugar and butter for about 3 minutes. Add egg and egg whites one at a time and beat until combined. Add buttermilk, lemon zest, vanilla, and applesauce until incorporated.

Add wet ingredients to the flour mixture and stir until just blended.  Gently fold in blueberries.

Place the batter into the prepared cake pan; bake cake until a toothpick comes out clean, about 40 minutes.  Serve room temperature.

To make a half-batch, use a 9 x 9 inch pan for nine servings, same baking time but the recipe is written for a full sheet cake.


Do yourself a favor and make this...  quick!

Tuesday, July 31, 2012

Baked Eggs in Chunky Tomato Sauce

I stole this recipe straight from Martha Stewart.  MS recipes tend to be good, so I felt confident that it would turn out alright.  We've had a few "eh" recipes lately... I was ready for something that we really loved.

This recipe would be great for a week of breakfasts.  I would pre-make the tomato sauce and refrigerate it.  In the morning, I would pre-heat the oven and scoop up 1/4 of the sauce and quickly heat it up in an individual sized baking dish.  Make the well in the sauce and crack the two eggs, adding 1 oz of crumbly cheese.  Bake for 5-10 minutes.  Top with cilantro (if you like it!) and dig in.

Uz and I really enjoyed this dish.  It was very hearty and filling!  You don't miss the protein from meat at all, with this clocking in at 22 g protein per serving.  Very nice!


Baked Eggs in Chunky Tomato Sauce

From Martha Stewart
Serves: 4
Stats: ~ 302 cals per serving

2 teaspoons extra-virgin olive oil
2 large bell peppers (red, yellow, or orange), stemmed, seeded, and diced small
1 large yellow onion, diced small
3 garlic cloves, minced
1 can (28 ounces) diced tomatoes
2 1/2 ounces baby spinach (2 1/2 cups) (or arugula or similar green)
Red-pepper flakes (optional)
Coarse salt and ground pepper
8 large eggs
4 ounces queso fresco or goat cheese, crumbled (1/2 cup)
2 tablespoons chopped fresh cilantro

Preheat oven to 400 degrees. In a large nonstick skillet, heat oil over medium. Add bell peppers and onion and cook, stirring, until softened, 8 to 10 minutes. Add garlic and cook until fragrant, 1 minute. Stir in tomatoes and cook 3 minutes. Stir in greens and pinch of red-pepper flakes, if using. Season with salt and pepper.
 
Transfer sauce to four 14-ounce gratin dishes or a 2-quart shallow baking dish. With the back of a large spoon, make 4 wells in sauce and crack 2 eggs into each. Bake until whites are set but yolks are still runny, about 10-15 minutes, rotating dishes halfway through. To serve, top with cheese and cilantro.

Note:  Martha says to cook 25 minutes, but this baked my eggs almost through.  I was pretty sad about that... I really looked forward to the runny egg!  Also, I cooked the cheese WITH the dish, and loved how it got super melty and delicious. 


I can definitely see this dish becoming a regular on the menu in the fall and winter time, when I need a cheap and filling dinner option, or an easy go-to breakfast recipe for days when I oversleep.  Enjoy!

Monday, July 30, 2012

Thai Steak Stir-Fry with Green Beans

This is a super-quick and budget-friendly meal.  Feel free to substitute the green beans for broccoli, asparagus, carrots... whatever you have in the fridge!


Thai Steak Stir-Fry with Green Beans

from Martha Stewart's Everyday Food magazine, July/August 2012
Serves: 4
Stats: ~187 cals, not including rice

Ingredients:
1 tsp canola oil
1/2 lb skirt steak, cut against the grain into thin strips
1 lb green beans, trimmed
4 TBS minced peeled fresh ginger
4 cloves garlic, minced
2 TBS fish sauce
1 c. fresh basil leaves, torn if large, for garnish

In a wok or large skillet, heat oil over medium-high.  Add steak and cook, stirring, until browned, about 4 minutes.  With a slotted spoon, transfer steak to plate.

Add green beans, ginger, and garlic and cook, stirring, until green beans are crisp-tender, 5 minutes.

Return beef and any juices to pan along with fish sauce and basil.  Cook 1 minute.  Serve with rice.

*NOTE*  For added spiciness, I included 1 TBS Sriracha sauce when I added the green beans.

Wednesday, July 25, 2012

delayed anniversary dinner at home: steak, greens, potato

The Saturday before our anniversary, my dad got a call that his step-father had passed away.  We had to make some last minute preparations to go to Tennessee to attend his funeral and visit my grandma.  Sadly, my grandma also only has 1-3 months to live.  It was a very emotional trip.  I have some pictures that I took in Tennessee, but I'm not ready to share them.

Anyway, we got back into town around midnight on Wednesday.  My husband had to stay home, so he'd been bach-ing it while I was gone.  He came home from work on Thursday to our planned anniversary at-home dinner...  STEAK!

Without further ado...


and we ended the evening on a sweet note...  a very miniature cake in our wedding cake flavors.


For the steak, we didn't do much to it.  Uz squeezed some lime and sprinkled it with salt and pepper as he was grilling it.  For the potatoes, I scrubbed the skins of red potatoes to clean them, put on a light coat of olive oil and sprinkled with sea salt.  I cooked them for about 80-90 minutes at 425 deg F.  The skins were VERY crispy but the insides were soft...  perfect.  The green beans were grilled in my husband's new grill pan.  Hands-on time for this dinner was minimal. 

The cake was wonderful!  A chocolate buttercream icing with chocolate fudge cake and raspberry filling.  Unfortunately I was so overcome when I was eating a small piece that I forgot to take a picture.  Oh well, such is life!


Friday, July 13, 2012

recipe: Spaghetti and Meatball Soup

Well, we've had some good eats around our place recently.  Sadly, this recipe didn't "WOW" us as much as the others.  It needs a little bit of work, so expect some updates the next time I try to make it.

Pros:  It was fast, cheap, simple, low-cal, and filling.
Cons:  Not extremely flavorful, had to add quite a bit of salt, meatballs were "alright".

What would I do to fix it?


-> For this recipe, I found I had to add a lot of fresh and dried herbs, even salt, to flavor the broth...  way more than the recipe originally called for.  It made me wonder if I did something wrong, because the original SkinnyTaste recipe has tons of comments about how great this dish is.  So maybe it was me, I don't know!  I normally don't add salt to anything, and even cut it in half for most recipes (except baking, of course).  However, I found myself adding quite a bit of sea salt more than once, so that was surprising.

-> Instead of making 36 tiny meatballs, I made 18 or 20 large ones.  Once they were in my bowl, I chopped them up into pieces with my spoon, but making larger meatballs cut down on my time.  In hindsight, I might just drop same-sized chunks of meat into the broth instead of taking lots of time to shape them perfectly.  A little more rustic, but I wouldn't complain.

-> The meatballs taste was okay.  I think I'd recommend using either: lean ground beef, chicken sausage, or turkey sausage.  I might also play around with a different cheese (something strong, maybe asiago?) and more dried herbs and/or salt in the meatballs.

-> I had personal issues with the noodles.  I broke them up into pieces as directed, but it made it really difficult to get even amounts of everything in the bowls.  The first two bowls ended up being mostly broth, as the noodles sunk and were too tiny to scoop well.  The last few bowls ended up being all noodles, no broth!  So I think next time I'd use a different type of noodle:  maybe some kind of fusilli,  penne, or even bowtie for a little bit of fun.

-> Lastly, I'm considering finely chopping some celery (keep the leafy ends! they add TONS of flavor) and carrots with the onions, and instead of just pouring the broth in the pot and adding the onions, sauteeing those veggies with some olive oil and garlic and red crushed pepper flakes.  In many of my other pasta dishes, I begin this way because it really adds another dimension of flavor.  I feel like this dish as is was missing that depth of flavor.

Every night when we have dinner, if it's a new recipe (or we're out to eat), we "rate" our food.  Usually, the recipes rate from a 7.5-10 on a 1 to 10 scale.  Please don't laugh; this is very scientific.  If a recipe or meal doesn't make at least a 7, then it just wasn't that good.  Last night Uz rated it at a 7 (and had kind of a questionable look on his face).  His comments were that the meatballs weren't as tasty as he'd expect, and he wished they were beef.  We also put some Cholula in the broth and that really helped give it some more flavor.

I guess I've talked your heads off, so on to the recipe.  I'm including my changes but I'll link to the original if you'd like to view that.  Maybe you can tell me where I messed up!

Spaghetti and Meatball Soup

Adapted from SkinnyTaste
Serves: 6
Original Stats:  213 cals
Modified Stats: 300-375 cals (depending what kind of meat you use!)

5 cups low sodium, fat-free chicken broth
2 cups water
1-2 chopped cloves garlic (maybe more, if you love garlic)
2 tbsp chopped fresh parsley
1/4 onion, chopped
1 carrot, finely chopped (modified version)
1 celery stalk with leaves, finely chopped (modified version)
1 tbsp olive oil (modified version)
3-4 tbsp tomato sauce (I used Hunt's Basil, Garlic, Oregano tomato sauce)
pinch crushed red pepper flakes (optional)
kosher salt and fresh pepper
6 oz dry pasta (original calls for cut up spaghetti, but I would try bowtie or penne or something similar)
  

For the meatballs:

16 oz ground meat (original calls for 99% lean ground turkey, I would use lean ground beef, chicken sausage, or turkey sausage)
1 small egg
1/4 cup seasoned breadcrumbs
1/4 cup grated parmesan cheese (I might use asiago or a mix of the two, even mozzarella!)
1 tbsp fresh chopped basil
2 tbsp chopped fresh parsley
1/4 onion, chopped
1 chopped clove garlic (more if you love garlic!)
dried herbs, such as thyme, oregano, basil, parsley


STEP ONE:

*Modified Version:*
In a soup pot over medium heat, add olive oil.  When hot, add onion, carrot, celery, red crushed pepper and saute until soft.  Add garlic and saute one minute more.  Add chicken broth, water, 2 tbsp chopped parsely, tomato sauce, fresh black pepper to a boil; simmer 5 minutes.


Original Version:
In a soup pot over medium heat, bring chicken broth, water, 1 clove crushed garlic, 2 tbsp chopped parsley, 1/4 of the chopped onion, tomato sauce, crushed red pepper flakes and fresh black pepper to a boil; simmer about 5 minutes.


STEP TWO:

Meanwhile, make the meatballs by combining ground meat, cheese, egg, garlic, onion, parsley, basil, breadcrumbs, salt, pepper, and any dried herbs.  Mix WELL.  Form into meatballs; you can make 36 small or 18 large meatballs or similar-sized chunks of meat.

forgot to take a picture of the egg!  whoops!

Gently drop meatballs into the broth (you can use a ladle if needed), cook about 3 minutes; add pasta and cook according to package directions. 


Add fresh basil, adjust salt and pepper to taste and serve with grated parmesan cheese.


I ate mine with 1/2 tbsp parmesan cheese, some fresh basil, and 1 oz ciabatta.  It was lovely, and I'm sure it'll be a staple this fall and winter... once I get it perfected, that is!


UPDATE:  It's so much better as leftovers!  Something about it just sitting and marinating I guess...  YUM.

Thursday, July 12, 2012

the recipe that will change your life: Green Chile Pork Enchiladas

Oh my word... these 'ladas were so much better than I expected.  The meat makes a huge difference, and coupled with the creamy queso fresco, sharp chedder, and tangy green chile sauce...  WOW.  Just, wow.  Uz, our resident Mexican in the house, claims these are his new favorite enchiladas.

Not bad for a white girl.

Anyway, on to the recipe and pictures.


Green Chile Pork Enchiladas

Adapted from Accidental Mommies
Serves: 12
Stats: 190 cals

2 c. pork carnitas meat (1/2 of the original recipe)
4 oz can chopped green chiles
3/4 c. crumbled queso fresco (or feta or goat cheese... any soft cheese should do)
at least 1/2 c. cilantro
12 6-in corn tortillas
2 - 2.5 c. green chile enchilada sauce (I love using Frontera when I'm in a hurry)
1 c. shredded cheddar cheese (or any Mexican cheese mix)
optional:  1 c. cooked white navy beans (not included in stats)


Preheat the oven to 425 deg F.

Heat up the pork.  In a large mixing bowl, combine queso fresco, chopped green chiles, cilantro, pork, and 1/2 c. enchilada sauce.  If you're using beans, add them here to the mix.  Make sure it's mixed well and evenly.

Spray a baking sheet with cooking spray.  Place tortillas on it and lightly spray with a little more cooking spray.  Stick in the oven for 2-4 minutes.  This will make the tortillas pliant so they don't break when you try to roll them.  You could also do this on a skillet with a little bit of cooking spray, but the oven method is faster and lets you do more at a time.


Place 1/4 to 1/3 cup mixture down the center of a tortilla.  Wrap, and place seam-side down in a large 8x12 baking pan.  Continue to do so with 12 tortillas, placing them close together in the dish.


Heat oven to 450 deg. F.

Separate 1/2 c. enchilada sauce.  Use the rest of the enchilada sauce to cover the enchiladas in the baking dish.  Top with 1 c. shredded cheddar cheese.


Wrap foil on the top of the baking dish, and bake for 10 minutes.  Take the foil off and bake for another 5, or until cheese is melted.

While the enchiladas are baking, heat up the remaining 1/2 c. enchilada sauce.  Remove from the oven and top with the warmed enchilada sauce.


Again, this was such a good meal.  I had two enchiladas, and my husband also had two with a side of latin yellow rice.  He's requested that we have these again soon...  and I can't argue with that!


They don't look as pretty here because it's hard to get them out of the dish without breaking them...  but what they don't have in beauty, they sure make up in taste!

Bon appétit!  Actually, that's French.  I guess ¡Buen provecho! or ¡Buen apetito! is a little more appropriate.


recipe: Slow-Cook Pork Carnitas

Oh, slow-cook pork carnitas, how I love thee.

I really do.  I could have this every week.  The meat is so versatile, and it makes enough for two or three meals (at least, for the two of us).

This recipe is for tacos.  I'm going to be using the rest of the meat for enchiladas this week, so watch for that!  I've been working on a recipe for a lime tortilla verde pork soup with this meat so you might see that soon as well.  I've used this meat in quesadillas (heavenly!) and tortas.  It's so easy to prepare.  If I was going to tell you to try ONE recipe, it would be this.

Thank you, Skinnytaste.  Thank you.

Anyway, on the recipe and pictures.


Slow-Cook Pork Carnitas

from SkinnyTaste
Serves: 8 (1/2 c. servings)
Stats: 176 cals

2.5 lb pork shoulder blade roast, lean, all fat removed
6 cloves garlic, cut into slivers
cumin
dry adobo seasoning
garlic powder
3/4 cup 99% fat free chicken broth
2-3 chipotle peppers in adobo sauce (to taste, these add heat)
2 bay leaves

Season pork with salt and pepper. In a medium sauté pan on medium-high heat, brown pork on all sides for about 10 minutes. Remove from heat and allow to cool.

Using a sharp knife, insert blade into pork, cutting small holes and insert garlic slivers. Season pork generously with cumin, adobo and garlic powder all over.

Pour chicken broth in the crockpot, add bay leaves and chipotle peppers. Place pork in crock pot and cover. Cook low for 8 hours. After 8 hours, shred pork using two forks and combine well with the juices that accumalated at the bottom. Remove bay leaves and adjust salt and cumin. Let it cook another 15-30 minutes.

If there is too much liquid left, leave the lid off for the last 30 minutes and let cook; some of the liquid will evaporate.  Also, if there is too much fat (it's hard to get it all cut off!) and you don't want it, just carefully pour the meat into a colander and then right back into the crockpot or a bowl.  It gets rid of all the excess fat, but the meat is still juicy.  You just have to be quick about it!


To make the tacos, we heated up 6" white corn tortillas on a dry skillet until they were golden and slightly crispy.  Put 1/4 c. meat on each taco, and top with whatever you want.  I used fresh cilantro, onions, chopped garden cherry tomatoes, chopped garden hot peppers, avocado, and Cholula.  I had 1 c. watermelon as a side, and my husband had a serving of the Mac and Cheese Broccoli casserole from the other night with his two tacos.


Tuesday, July 10, 2012

man food. sort of.

Over the weekend, we had some man food.  Sort of. 

By man food, I mean we had pizza and wings.  By "sort of", I mean we had veggie Italian pizza and wings.  My husband informed me that "man food" pizza would have been a meatbusters pizza.  I'm sure that's quite true, so I guess our pizza isn't quite man food...  but it's close enough, right?  Right?!?

Anyway, I used the Pillsbury thin crust.  Preheated at 500 deg F while I chopped up some onion, bell pepper, tomatoes, mushrooms, and mozzarella.  I sprayed the pizza crust with some olive oil spray and baked for a few minutes until lightly golden.  Spread tomatoes first, then all the other veggies.  Top with cheese (we used a mixture of sliced provologne, fresh mozzarella chunks, and shaved parmesan).  Bake until melty and golden.


I had bought the wings on sale at Sunflower Market, so all we had to do for those was stick them in the oven at 500 deg F for a few minutes, flip once, and eat when they're hot!  EASY AS PIE.  Only there was no pie.  Sad times.


We approximated the wings at 85 calories each, and 1/8 of the pizza (the slice pictured) as 204 calories.  Blame it on the excess of cheese.  Later, I had another slice as a snack.  The best way to reheat pizza for a snack is to stick it on a pie pan and bake at a hot temperature until it's warmed up...  no more gooey or hard-as-rock crust!

What are your favorite pizza toppings?
 

recipe: Mac and Cheese Broccoli Casserole

Don't be scared by the word "casserole".  Repeat after me:  "Casseroles are friends.  Casseroles are not scary.  Casseroles are easy.  Casseroles are tasty."

Anyway, this is a really good and filling dish that can be used as a side, or even a main meal.  For those of you who crave lots of meat, throw in a cup or so of shredded chicken.  Or add ground hamburger meat to make it a healthy alternative to Hamburger Helper!

Sorry for the awful picture...  We got home at 9:30 on Sunday evening after being gone since 9:00 am.  Thankfully, I had pre-made this on Saturday so all I had to do was add the bread crumbs, parm, and spray then bake to heat up.  So, instead of taking a picture of the pretty finished product, I ended up diving in headfirst and eating.  So a picture of my lunch portion today will have to do until the next time I make this, and can update the picture.  Sadly, you can see the gorgeous topping of breadcrumbs and cheese...  the crispiness is our favorite part! 


Alternatively, you can check out SkinnyTaste's version...  they are basically the same, with a few minor changes. 

Mac and Cheese Broccoli Casserole

Adapted from SkinnyTaste
Serves: 8
Stats:  349 cals per serving

12 oz pasta (such as elbows, twists, penne, etc... long spaghetti-like noodles don't work so well)
2 tbsp butter
1/4 cup whole wheat flour
1/4 cup minced onion
a tad of minced garlic
2 cups 2% milk
1 cup fat free chicken broth (vegetarians use vegetable broth)
8 oz (2 cups) shredded cheddar
salt and fresh pepper to taste
12 oz fresh broccoli florets
1/8 cup grated parmesan
1/4 cup seasoned bread crumbs
cooking spray

Cook pasta and broccoli together in a large pot of salted water, according to package directions for al dente (or slightly under cook 2 minutes). Spray a baking dish with cooking spray. Preheat oven to 375°.

In a large, heavy skillet, melt butter. Add onion and cook over low heat about 1 minutes; add garlic and cook for another minute. 

Add flour and cook another minute, or until the flour is golden and well combined. Add milk and chicken broth and whisk, raising heat to medium-high until it comes to a boil; cook about 5 minutes or until the sauce becomes smooth and thick. Season with salt and pepper.

Once the sauce is thick, remove from heat, add cheese and mix well until cheese is melted.

Adjust salt and pepper to taste, add cooked macaroni and broccoli and mix well. Pour into prepared baking dish.

If you're going to refrigerate or freeze, stop here.  When it's time to heat the dish, thaw (if needed) and continue to follow directions.  You may have to cook 20-25 minutes if cold.

Top with grated cheese and breadcrumbs. Spray a little more cooking spray on top.

Bake for 15-20 minutes, then broil for a few minutes to get the breadcrumbs golden.


So we had a square of this casserole for dinner, along with a meat.  Uz had a broiled hot dog with a bun and mustard...  I had half a sausage biscuit leftover from our Sunday School breakfast.  I was going to have a hot dog, but I was so hungry while I was waiting on this to finish baking and prepping for the pork carnitas that I had to have a little sumthin'-sumthin'.

And check this cutie out!  She's got her favorite little Sonic Tot toy... how can anyone resist this?